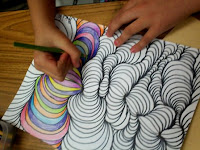
I was asked if I could go into a bit more detail concerning the Line Design "process". I think the easiest way is with a few more pictures than my previous post on "how to". I hope this helps...and as always...if you ever have questions about anything on my blog...e-mail me at artwithmre@yahoo.com
The materials you need for this project are good drawing paper(9x12...but could be done any size), Sharpie Marker, and your choice of media(see the bottom of this post for some ideas).
Start with a gentle curve line across the paper. Don't go too crazy hilly with the line...it will make it difficult in the steps that are to come!
Place eight dots on the line spaced at different distances.
Go dot - to - dot across the entire line. Do not continue to do this however...or it will create a kind of boring column like work(going straight up & down).
As you are going dot -to- dot, you need to "camp out" on some of the segments. This will help them to balloon out & look oh so cool! This will also cause others to be "pinched off"...and that is fine. The lines need to continue off of the paper...and should not just stop cause they are close to the edge. As it gets bigger and bigger, the lines will have to be shared going back to the dot...and yes..they should really go back to the dot. Going back to the dot each time creates the darker shadow"ish" areas that help create depth.
The two pictures above are the WRONG way to do this. The lines should NEVER criss-cross each other. I tell my students that the lines can share a path...but never cross over another line. The second picture is the "RAINBOW CONNECTION". It is a lot easier to do it that way..but it is not correct.
So here you see the results of the ballooning out, pinching off, and going off the edge of your paper.
I thought I'd show you how different media works in this project
1. Watercolor Pencil - A little labor intensive, after you color it..you have to go over with with a brush.
2. Watercolor - I like this a lot, but you would need to make sure the students understood to not put color beside color because of bleeding.
3. Crayons - This works much like colored pencils, but they are a bit chunkier so it's hard to get into the small spaces.
4. Colored Pencil - This is how I usually do the project with my students...I love colored pencils!
5. Marker- This kind of takes the shading element out of the project, but if you were going more for color families and such...could work!


